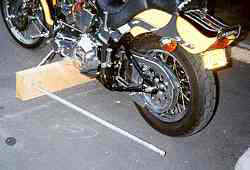
Homemade Motorcycle Lifts (thanks to Jon84 for the info below, found on nightrider.com's online site):
There are several ways to make a lift for your motorcycle. With a welder and a little "know how" you can go so far as to make your own table lift. In this section, we will discuss the cheapest, quickest ways to make a M/C lift. These lifts will only raise one tire at a time. The other tire will remain on the ground and then the lift will support the frame on both sides. This will give the bike 3 points of contact, leaving it very stable while it is in the raised position.
Here's how it works: http://www.youtube.com/watch?v=NUJmWU63jfg
First you will need a piece of wood approximately 4X8 inches and approximately 3 foot long. Now, this can be a couple 2X8's screwed together to make it 4 inches thick. If you have 2X10's laying around, that will work too.
NOTE: in addtion to what's explained below, place one small piece of a 2X4 onto each area of the lifting board where the motorcycle frame touches the lift. This gets the oil pan on the bike high enough so that it does not touch the lift.
NOTE: handle can be positioned towards either end of the lifting board, depending upon on which side you wish to position it when lifting your bike.
The following tools are needed to assemble the lift:
 |
Pencil & Ruler |
 |
Electric (not battery powered) Drill |
 |
1" and 1 3/8" Paddle bore drill bit or adjustable hole saw drill attachment |
 |
3/16" Wood drill bit |
 |
1/2" Socket to tighten lag bolts |
 |
Small pipe wrench |
Instructions:
- Locate and mark a point on the 8" wide side of the 4"x8"x3' piece of wood that is 3 1/2" from end and on the centerline of its length.
|

|
Congratulations! Your bike lift is done. There are a few other little things you may want to do on your bike lift listed below.
To operate your lift, insert the wood directly under your frame somewhere beneath the engine. Check that you won't be putting pressure on something you shouldn't. Insure the ground beneath your bike is level. If you can with your left hand, hold your bike upright leaving the kickstand extended outward. Now push the handle of your new lift rearward and downward. Your bike is lifted and in an upright position making it easier to work on, clean and to check the oil.
Notes and Improvements:
Paint the pipe handle red. This might prevent you from accidentally falling over it.
Wrap some duct or electrical tape around the handle end of the same pipe for comfort.
Stapling or tacking down some old carpet over the lifting edges of the 4" x 8". This will keep the wood from removing paint from your frame each time you lift your bike.
If you can not find a 4"x8", you can buy a 2"x8" 8 foot long and cut it in half. Put the two pieces together, forming a 4"x8" and nail them together. Better yet, use 2 1/2" drywall screws to fasten the two pieces of wood together.
8 inch wide lumber is actually closer to 7 1/2 inches wide. Some bikes may require a slightly higher or lower lift. You can use 2"x6" lumber for very low bikes, or add a piece of 1"x4" lumber on the top raise the bike some. With a Sportster, you can cut the 1"x4" into two pieces, leaving the required notched section for the exhaust pipe.
The pipe will not thread all the way to the bottom of the pipe flange. Don't EVEN try to thread the flange from the bottom up to save from counter sinking the flange.
Use a 4' long 4" x 8" and put two eye bolts in the wood about 3" from each end so that they face the ceiling when the bike is on the lift. Now when you put the bike up, take off your seat and use two nylon pull type tie downs to secure the bike frame under the seating area to the lift at the eye bolts. Straddle the bike and pull them tight simultaneously. The bike WILL be very stable. No more worries about the narrow Sporty frame or the bike's stability while up on the lift.
When drilling the holes to install the pipe and flange, use two different size bits so that the wood lends some support to the pipe and the flange doesn't take all of the weight. This improvement is listed in the assembly steps.
Comments (0)
You don't have permission to comment on this page.